
Having a great accounting package is not only central to your business requirements, allowing you to create Purchase Orders, Invoices and Receive Payments, but really knowing how to get your way around will not only increase satisfaction with the software, but boost productivity aswell. Being Reckon Accounts Professional Partner Consultants we specialise in helping you to get the most out of your Reckon software, we therefore present to you Our Top Ten Time Saving Tips for Reckon Accounts.
1. Memorised Reports
Without a doubt one of Reckon Accounts’ strongest assets is its reporting engine. With up to 250 reports as standard, you can always get out what you put in.
However, the real strength lies in just how flexible the reporting engine is; allowing you to manipulate your reports by adding extra columns, filtering and renaming reports to suit your needs.
If you find yourself repeating the same steps over and over with the same report, simply click on the Memorise icon to give the report a name and save it.

Tip: You can setup custom Memorised Reports folders under Reports – Memorised Reports – Memorised Reports List. Saving your reports in their own folders will make locating reports easier and means everyone in the organisation can store their own favourite reports into their own folders. Or you might create reporting groups such as Month End Reports, BAS Reports or Payroll Tax Reports.
2. Process Multiple Reports
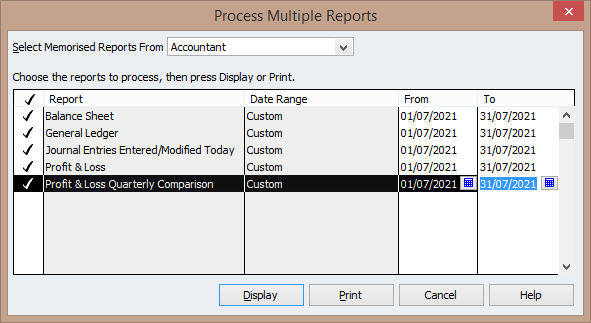
Following on from Point. 1, the beauty of saving your Memorised Reports into Folders allows you to run the report group as a batch, setting the report date ranges before running the batch. This means you can run an entire suite of reports in a matter of mere seconds, rather than individually running each report one at a time.
Hence, once you have created your reporting group, simply go to Reports – Process Multiple Reports and select the Folder you wish to run from the drop down menu, set your dates, and select Display or Print (we prefer Display first).
Tip: To save even more time, enter your first date, then highlight the date and copy and paste it down to the other reports to save you re-typing the date multiple times!
3. Keyboard Shortcuts
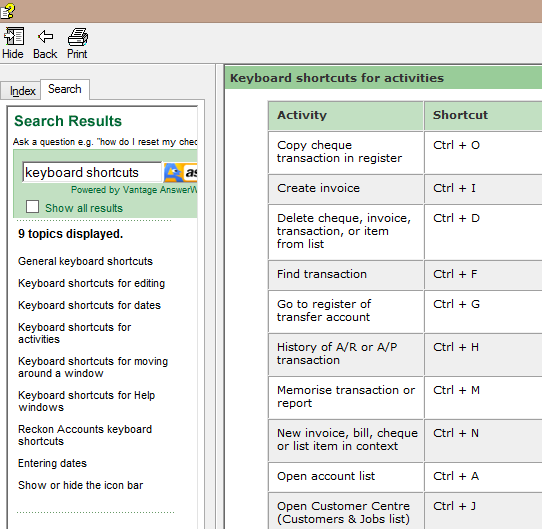
To increase your data entry speed and general “flow” within your daily work, try to learn some of the many keyboard shortcuts within Reckon Accounts.
You can raise invoices, enter expenses, access your chart of accounts, perform a quick report, drill into a report, change the date and many more without ever having to reach for your mouse!
There are too many commands to list here, however we have copied some of them for you to see.
To access the full list from within Reckon Accounts, simply press the F1 key to launch the Help command, then type in Keyboard Shortcuts and search. From there you can print the commands out for easy reference.
4. Icon Bar Shortcuts
We all love computer desktop shortcuts right? They save us a ton of time by getting us right where we need to be in the shortest amount of time.
If you are a shortcut person then you will love this tip – as you can create and save your own shortcut icons within Reckon Accounts, right on the Icon Bar.
However, before you begin, you will need to free up some space by removing the standard icons. To do this right click anywhere in the Icon Bar and choose Customise Icon Bar.
![]()
Next, highlight the first item in the list and press Delete. For the purposes of this exercise, we have deleted out all of the standard icons and replaced them with custom tasks and reports.
![]()
Once all of the items are deleted, click OK to return into Reckon Accounts.
Now, you simply need to decide what it is you would like to create a shortcut for, and launch that task (or report).
With the task or report on screen, click under the View dropdown menu, then add “Task or Report name” to Icon Bar. This will launch the Add Window to Icon Bar selection screen, where you can choose and icon and a label.
Tip: Try to create a shorter label as a long label will take up a lot of space on the Icon Bar.
![]()
Click OK when done, and you will see your shiny new icon on the Icon Bar.
![]()
Tip: Combine your favourite Memorised Report with a Custom Icon for added productivity!
You can create as many Icons as you can fit on the Icon Bar, you can also pull down the Icon Bar to create more space and choosing shorter label descriptions.
Icons can be renamed and re-ordered again by right clicking in the Icon Bar and going back to Customise Icon Bar, where you can also add separators to create groups of icons.
5. Memorised Transactions
We already covered Memorised Reports in Tip 1, however did you know you can also create Memorised Transactions? Setting up Direct Debits, Drawings, Loan Repayments and Regular Expenses as Memorised Transactions will not only save you time in data entry, however will also ensure those regular transactions are always entered on time, so you don’t have to worry about it.
To create a Memorised Transaction in Reckon Accounts, first launch the transactions, (let’s say a fortnightly direct debit for Equipment Hire), raise the expense entry via Write Cheques, complete the expense entry, then before clicking Save and Close, right click anywhere in the transaction screen and select Memorise Transaction (in this case it will say Memorise Cheque).
In this example we have chosen Standing Order as we want the transaction to process automatically, then have setup the schedule and number of transactions remaining.
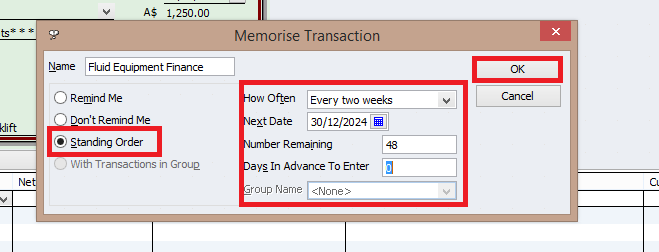
When the due date approaches for the transaction to be posted, you will be prompted upon login to accept and allow the transaction to be entered.
Tip: You can keep track of your Memorised Transactions under Lists – Memorised Transaction List, or CTRL-T for short.
7. Lodge Your BAS via Reckon GovConnect
If you are not already using the built in Simplified BAS function in your Reckon Accounts software to prepare your BAS, then you should be.
This tip assumes you use the Simplified BAS however are not lodging your own forms electronically.
Reckon GovConnect is provided with your Reckon Accounts software CD and is a separately installed application. This tip also requires that you have an Auskey loaded on your computer and are the authorised signatory of that Auskey. (more Auskey information can be found here )
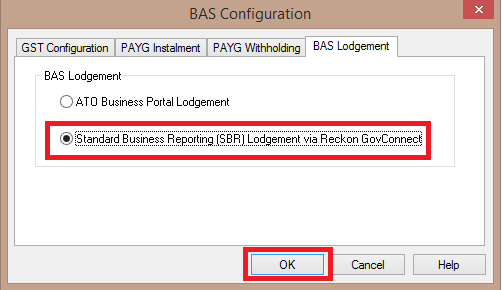
Hence to lodge your own BAS using Reckon GovConnect and your Auskey, first launch the Simplified BAS form from Reports – Tax – Simplified BAS/IAS and prepare your BAS as you normally would. Then click into the Config tab and head over to the BAS Lodgement tab from within the Config screen. Now select “Standard Business Reporting (SBR) via Reckon GovConnect and click OK.
Once your BAS is complete, now hit the Lodge button at the bottom of the Simplified BAS form, which will launch Reckon GovConnect. The software may take a moment to launch whilst it scans your computer for your Auskey. At the login screen, login with your Auskey password and click Enter.
Once logged in to GovConnect, proceed through the wizard to import and check your BAS figures before lodging directly to the ATO.
Tip: Don’t forget to print or record your lodgement receipt number for safekeeping!
The full Reckon GovConnect user guide can be downloaded from this link.
8. Open Automatically To Desired Pages or Tasks
By default, Reckon Accounts is set to remember the last opened reports or tasks and open to the Home Page every time the software is logged in. This is handy if you accidentally close the software and were working on some important reports as they will reload when you log back in.
This can also be a cause of slowness for some users though, as the system may take some time when faced with a large company with many users. This is counter-productive to getting your work done. This next tip will help you log in and cut straight to where you want to be.
Let’s say every time you log in, you would like your Accounts software to open to the Company Snapshot, and not open anything else.
First, we need to close all open Windows, and then click on the Company Snapshot screen to launch the dashboard. Once opened, head into Edit – Preferences – Desktop View.
Next, select “Save Current Desktop”, and untick “Show Home Page when opening a company file”; and click OK.
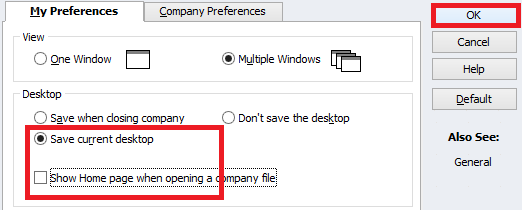
Now, log out of your Company File and log in again, you should go straight to the Company Snapshot with no other windows open.
Tip: For an even faster login experience, choose “Don’t Save The Desktop”. This will open your Company File almost instantly!
9. Customise Columns
This tip is a shining example of the flexibility of the Reckon Accounts software range – seldom can we not find information right at our fingertips!
This example assumes we have Sales Reps, and we would like an easy way to see the Rep attached to an overdue invoice.
Rather than run a complex report, we can acquire this information right from the Customer Centre. Hence click on the Customer Centre to display the Centre, which shows our Customer List and transactional information.
Select the customer and in the lower right hand side where you can see the list of transactions, select to show Invoices, then Open Invoices then All Dates. This will display a list of Open Invoices for each Customer.
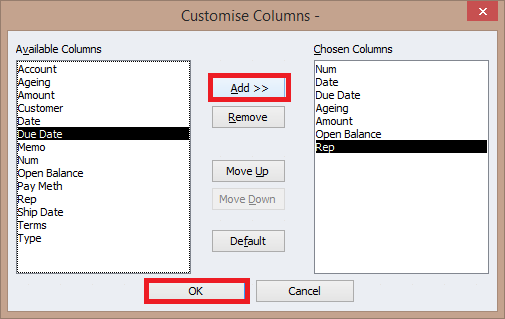
Now, to add information, right click in the transaction display area and select Customise Columns. From the list of available fields on the right, select Rep and Add, then Due Date and Add. This will add the new fields on to the list of Chosen Columns. You can also remove unnecessary columns while you are there. Then click OK to save and display your new columns.

Almost all of the List screens in Reckon Accounts have this feature, so everyone in the organisation can set their own screens to display exactly the information they require.
Tip: To turn this view into a Report (which can be further modified and saved using Tip 1), right click in the transaction area and select View As A Report.
10. Schedule Automatic Backups
Our final tip will not only save you time, but could also save your company information!
Without a doubt in this digital age we can not have enough backups. Whether you have an on site or Cloud backup service, you should be backing up all of your mission critical data daily.
One simple way you can ensure your Reckon Accounts data is constantly being backed up, is to automate the process. You can even have your Accounts system back itself up every time you close your company file.
To access this feature and setup a Backup Schedule, you need to go to File – Save Copy or Backup and proceed as if you were to take a normal backup.
However, before saving your backup file, one of the questions on the Backup Wizard is “When do you want to save your backup copy?”. From this screen, select “Only schedule future backups” and click Next.
You are now ready to set your backup schedule. You will notice there are two options available here, either to backup automatically at a set number of file closes, or to set a full Backup Schedule. Decide which is best for yourself, and enter the desired scheduled information. (If you are creating a Backup Schedule, you may need your Computer Administrator’s password to save the Schedule).
In this example, we will tell Accounts to backup our file every time we close it by ticking “Save backup company automatically when I close my company file every “1” times”.
Now just click finish, and close down your Company File. You will then see an Automatic Backup taking place. The backups will be saved in your regular backup location and are prefixed with “ABU” for Automatic Back Up.

Tip: Click the Option button to change or set backup location and limit the number of automatic backups that are held on the system.
Thus concludes our Top Ten Time Saving Tips for Reckon Accounts. We trust you will find this post handy and useful.
Please bookmark or print this page for future access, and look out for further instructional blogs on our page.
Have some handy hints of your own? Why not leave them in the Comments section below.
And for further assistance or training, please keep an eye on our regular Classroom Training courses, or get in touch for a one on one personalised or group training session.
Happy Accounting!